


Eaves and windows and vertical tiling
The following illustrations and text explain the common main tile design details that can occur on refurbishment and new work to eaves and windows.
Vertical tiling to eaves with soffit
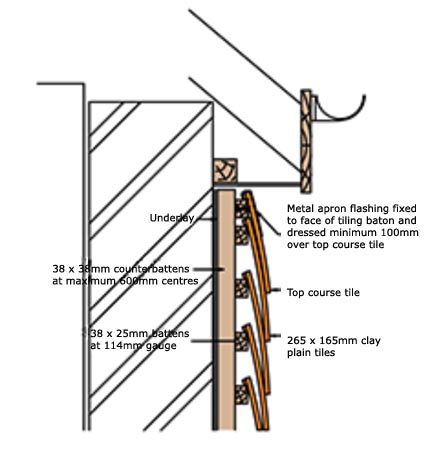
Finish battens approximately 90mm below the soffit board to allow for the top tile batten to be installed. Install a lead cover flashing to lap over the top tile by a minimum of 100mm. If no top tile is used, the lead flashing coverage should extend to 150mm.
Nail the bottom edge of the flashing (minimum 200mm wide Code 4) along the face of the top tile batten and dress it into the top tile nib space below the soffit board. Once the top tiles have been nailed the flashing can be carefully dressed onto the surface of the top tile.
When using decorative flashing, add the decorative section onto the coverage such that it does not compromise the lap relative to the vertical joint and nail holes.
This arrangement is useful when fixing vertical tiling to the face of an existing building.
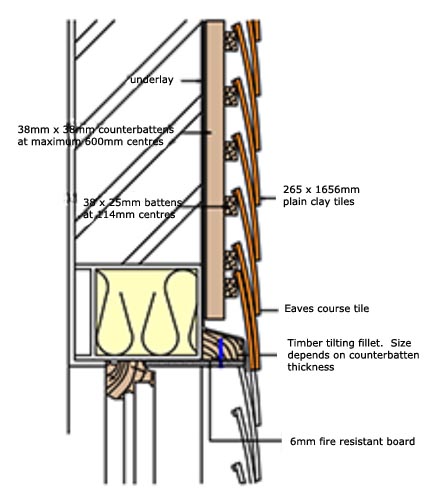
Vertical tiling to window head V1
Set the eaves course above the window to allow the window to be installed or removed after the vertical tiling has been installed.
Set the gauge of the vertical tiling between the window sill and window head to eliminate the need for cutting the eaves course of tiles.
Fix a shaped timber tilting fillet to the face of the lintel (approximately 100 x 75mm) large enough to support the eaves course of tiles in the same plane as the rest of the vertical tiling.
Dress the underlay over the tilting fillet to a slight fall.
Terminate the counterbattens just below the eaves tile batten to allow the underlay to dress out over the tilting fillet.
Fix a minimum 6mm thick fire resistant board to the underside of the tilting fillet. Alternatively, cut plain tiles with their nibs removed could be used.
Vertical tiling to eaves with open rafter
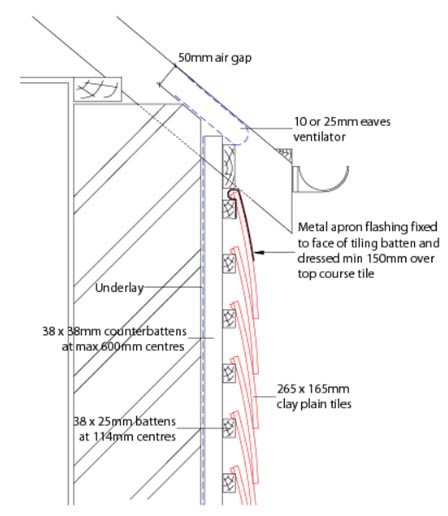
Finish under roof eaves with a continuous course of tops tiles.
Fix a code 4 lead flashing to cover the top tiles as described in detail (9).
Where the roof is ventilated using a vent tray between the rafters, the air path to the grill must be maintained.
Set the counterbattens at maximum 600mm centres and extend as high as possible.
The spacing between the open rafters and above the top tiles needs to be in-filled. This can be achieved by 19 or 25mm timber boarding, fixed to vertical noggins nailed into the sides of the open rafters. Note: Where there is no provision for eaves ventilation the timber boarding can be extended up to touch the underside of the roofing underlay. This detail will prevent birds from nesting between the rafters.
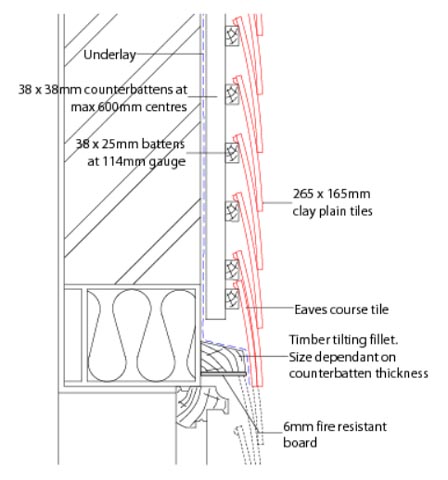
Vertical tiling to window head V2
Set the eaves course above the window to allow the window to be installed or removed after the vertical tiling has been installed.
Set the gauge of the vertical tiling between the window sill and window head to eliminate the need for cutting the eaves course of tiles.
Fix a shaped timber tilting fillet to the face of the lintel (approximately 100 x 75mm) large enough to support the eaves course of tiles in the same plane as the rest of the vertical tiling.
Dress the underlay over the tilting fillet to a slight fall.
Terminate the counterbattens just below the eaves tile batten to allow the underlay to dress out over the tilting fillet.
Fix a minimum 6mm thick fire resistant board to the underside of the tilting fillet.
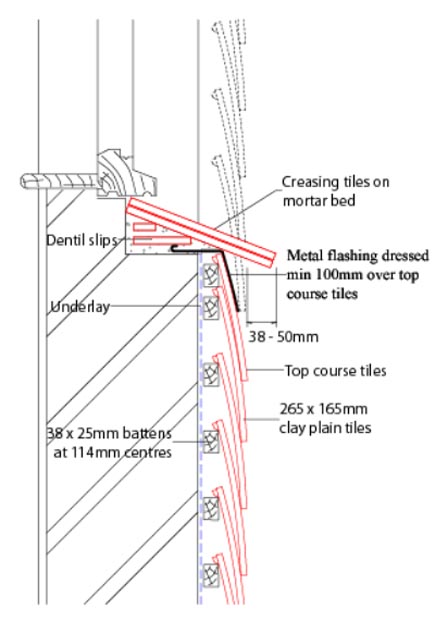
Vertical tiling to tiled window sill
Ensure that there is a suitable fall on the top surface of the double course of creasing tiles to allow water to run away from the window frame. A cut out in the external wall may be required.
Finish battens below the window opening to allow the top course of tiles to fit under the window sill.
Lay the creasing tiles broken bonded bedded on mortar (1:3 Cement:sand) using dentil slips as required. The creasing tiles should overhang the vertical tiling by 38 to 50 mm. Install the lead flashing (Code 4) into the mortar bed. Once the top tiles have been fixed the flashing can be carefully dressed onto the surface of the top tiles. When using a decorative flashing add the decorative section onto the coverage such that it does not compromise the lap relative to the vertical joint and the nail holes. The flashing should cover the top tiles by a minimum 100mm. If tops tiles are not used then the flashing should be extended to 150mm. It should extend a minimum of 150mm beyond the jamb on either side.
Vertical tiling to timber window sill V1
Finish battens below the window opening to allow the top course of tiles to fit under the window sill. Nail a lead flashing (minimum 200mm wide: Code 4) to the underside of the timber sill before it is installed. Once the tops tiles have been fixed the flashing can be carefully dressed onto the surface of the top tiles.
When using a decorative flashing add the decorative section onto the coverage such that it does not compromise the lap relative to the vertical joint and the nail holes.
The flashing should cover the top tiles by a minimum 100mm. If tops tiles are not used then the flashing should be extended to 150mm. It should extend a minimum of 150mm beyond the jamb on either side.
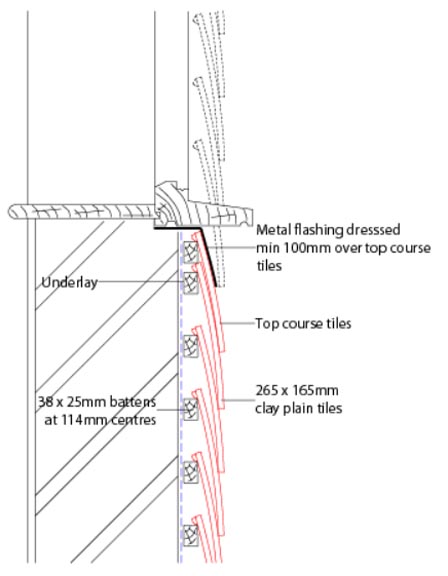
Vertical tiling to timber window sill V2
Finish battens below the window opening to allow the top course of tiles to fit under the window sill.
Nail the bottom edge of the lead flashing (minimum 200mm wide: Code 4) along the face of the top tile batten and dress it into the top tile nib space. Once the tops tiles have been fixed the flashing can be
carefully dressed onto the surface of the top tiles. When using a decorative flashing add the decorative section onto the coverage such that it does not compromise the lap relative to the vertical joint and the nail holes. The flashing should cover the top tiles by a minimum 100mm. If tops tiles are not used then the flashing should be extended to 150mm. It should extend a minimum of 150mm beyond the jamb on either side.
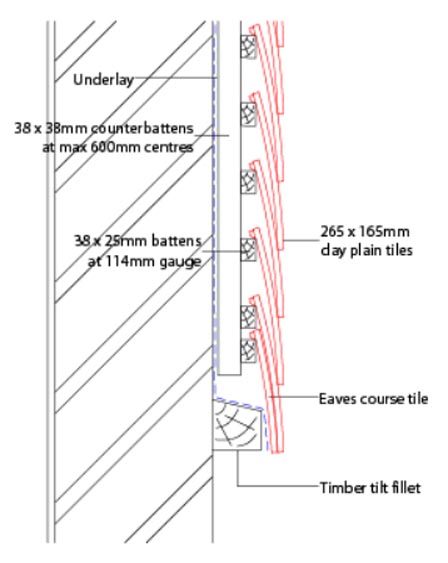
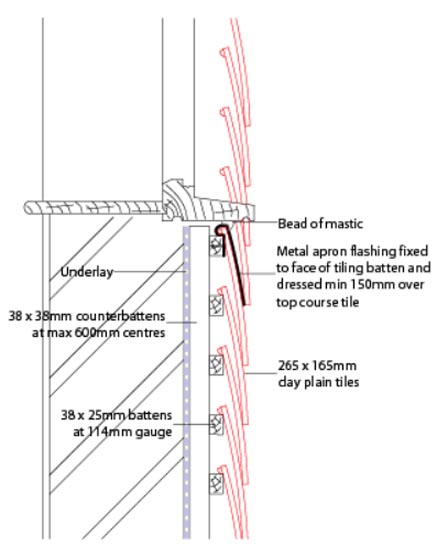
Vertical tiling eaves
Fix a shaped timber tilting fillet to the face of the lintel (approximately 100 x 75mm) large enough to support the eaves course of tiles in the same plane as the rest of the vertical tiling.
Dress the underlay over the tilting fillet to a slight fall. Terminate the counterbattens just below the eaves tile batten to allow the underlay to dress out over the tilting fillet.
Where there is a risk of fire entering the batten cavity fix a minimum 6mm thick fire resistant board to the underside of the tilting fillet.